How to…Paint the Queen – Final flourish

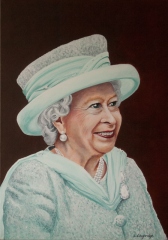
…and so to the grand(?) finale of our paint the Queen series. In previous posts we measured her up to create an initial sketch then painted the foundation layers of the painting (her undies). Unfortunately, this created a slightly bizarre green/purple face at the half way point that resembled a face made of corned beef, so it’s important to keep the faith at this stage.

With the underpainting complete, we’re ready to start applying the flesh tone glazes that will (hopefully) develop into the universally recognisable facial features of the Queen (or whoever else we may be painting at this stage – the same process applies regardless of our subject). So, with our tools at the ready…we’re ready for our final flourish.

Step 4. Fleshing out the detail

I prefer to use my own recipe to create the flesh tones in my paintings, rather than using  flesh tones or buff whites from a tube. This is mainly so I know what colours I’m working with and can manipulate them as I want to. It’s a bit more tricky to adjust red and yellow values in the flesh tones when you don’t know quite what went into the pre-mixed tubes (the argument does fall down a bit with the addition of yellow ochre, but that’s much less significant in the proportions of the mix).

Karen’s flesh tone recipe:

    • White – I tend to use titanium white, but flake white works well too
    • Yellow Ochre
    • Cadmium red (Light)
    • Cadmium Yellow
    • Burnt Sienna
    • Burnt Umber
    • Ultramarine Blue

Generally I use about 6/7 parts white to 1 part colour and tend to use cadmium yellow or yellow ochre and cadmium red to create a base flesh tone. Beware of adding too much red and creating the kind of pink flesh we might have created when we were kids – skin has much more yellow in it than you might think! To create medium flesh tones I use yellow ochre instead of cadmium yellow, and a touch of burnt sienna. Finally for darker flesh tones  I’ll use cadmium red, burnt sienna, and burnt umber – ultramarine blue helps to create cool tones too!

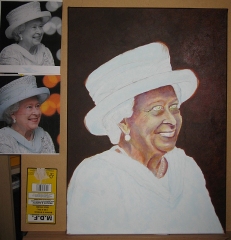
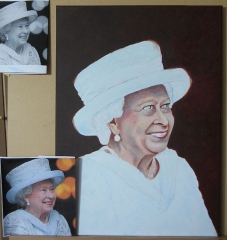
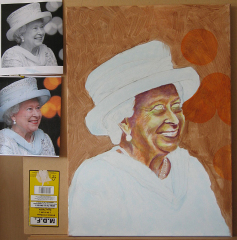
I always work with a stay wet palette to help keep the acrylic paints workable for longer, so I mix a range of skin tones I’m likely to need before I start working on the facial features. This means I can pick up from the full range and blend my colours quickly before the acrylic dries on the canvas.The Queen receives her first  glaze layer using a light flesh tone which starts to bring the under-painted elements together immediately.

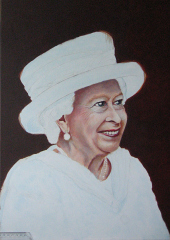
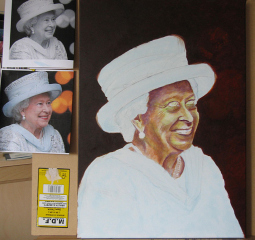
A few more glaze layers and as the corned beef effect disappears the face is becoming more real, and developing a lovely depth. Working with the pre-mixed palette means I can pick up a touch of the dioxazine purple and greens I used in previous layers as I work, to cool and/or darken the tonal values. Picking out the detail of the lips and shadows of the eyes helps too, but you can really start to see the benefits of having those base layers now as the “undies” reflect through the translucent final glazes!

A final flesh glaze, with a touch of red to the cheeks and we’re ready to work the facial features to a finish. The eyes are a grey-blue, picked out of the palette with ultramarine blue and Payne’s Grey. They come to life with the addition of a highlight to make them sparkle.

The lips are finished with cadmium red, tempered with dioxazine purple and some burnt umber lowlights. Notice also how the reds stand out and “flash” against the purple we under-painted earlier, below the lower lip. One of the things to watch out for now is the teeth…picked out individually, these can easily look like tombstones and create the impression they have been borrowed from one of the mares in the Queen’s stables! (I’ll tone these down shortly with Payne’s Grey and a little yellow ochre to try to make them recede a little.

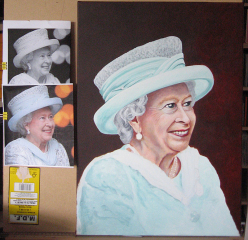
 The Queen’s hair has little more colour than my own and I know mine is made up of a balance of dark hair among lighter hair…cue Payne’s Grey with Titanium white. The same palette produces a stippled texture in the hat, with the addition of a pearlescent medium to help this shimmer, and is reused to create the shadows in the rest of the outfit, before the application of colour, which is built up in further layers.

The final challenge…the Queen’s jewellery. The pearls are relatively easy to create using white, a touch of yellow and Payne’s Grey in varying proportions to create highlight, lowlight and shadows (used to touch in the the teeth too). The greater challenge however is to create the impression of brilliance emerging from the Cullinan Diamond brooch. Reference to various images on the internet and elsewhere makes it clear there’s no way I can paint the myriad facets carved into these beautiful stones. The images are good enough though to provide an idea of overall shape and the main facets of the stones and I can create the impression of these using my trusty Payne’s Grey, yellow hints and blue and brilliant white highlights to create the sparkle.

This was without doubt one of the most difficult pictures I have painted and as usual I know where and how I would improve a further attempt. I didn’t succeed in the competition I painted the picture for, but I have a strong sense of personal satisfaction. I have completed the task, produced a painting that resembles and even improves upon the Queen (I have brightened her eyes and teeth slightly to take a couple of years off her) and I know the painting is recognisable as HRH.

Above all, I have thoroughly enjoyed putting my all too infrequently used portrait painting skills into practice…I must do something like this again and very soon! In the meantime…..where on earth do I hang a Portrait of the Queen?!


HELP! I missed Part 1 | Part 2

How to…Paint the Queen – “Undies”

OK, so I don’t mean “undies” literally, it’s not like I’m suggesting we’re going to paint the Queen and put a pair of bloomers on Her Majesty’s head or anything (though that might have caught the attention of the competition judges). Hey, if that’s why you’re here…I’m sorry, but my upbringing would prevent me from doing anything quite so irreverent.

Yes, I can still remember those times when, as a kid armed with my Union Jack Flag on a stick I queued on Wimbledon High Street with my Mum and siblings waiting to wave it wildly for the Queen when she visited.  I also remember:

  • Celebrating the Silver Jubilee with a red, white and blue street party in 1977 (I still polish the celebration spoon every few years)
  • Waiting with nose pressed against the Buckingham Palace railings waiting for a glimpse of Charles and Diana, following their engagement, and shouting “we want more, we want more” to bring them back out onto the balcony once they had obliged us with a wave the first time
  • Watching the Queen pass really close up when I formed the guard of honour on centre court, Wimbledon, as a ball girl

Yes, I remember all those things and more. I will admit to being into the punk scene as a teenager though, partly because I had a strange fascination for safety pins (or at least the reaction of people who thought you were wearing them through your ears and/or nose once you had taken enough off the sharp, pointy end to slide them into position). This wasn’t a phase that lasted long, but it meant I enjoyed the Sex Pistols’ rendition of God Save The Queen just as much as the next rebellious teenager! On balance though …no chance we’ll be doing the Queen’s underwear here!

Anyway, last time round I explained how I develop an initial outline sketch for a portrait. This one happens to be about my portrait of the Queen, but the same approach can be applied to anyone. With the outline transferred to canvas we’re ready to move on to our painting.

What are the undies?

The “undies” are what the picture will be wearing underneath the surface, once finished. Like all good undies (current fashions excepted – don’t think I’ll ever get the need to show one’s pants) the underpainting for our portrait will likely be unseen once it’s fully dressed. That might beg the question “why bother then?” but I like to create a good underpainting for a few reasons:

  1. To reduce the “tooth” on the canvas. All my canvasses are pre-primed with two coats of Gesso but this still leaves quite a “tooth” or texture on the canvas. Once I’ve added a couple more layers of paint to the surface the paint flows much more easily for subsequent glaze layers and that helps when I want to manipulate the paint to blend soft edges and tonal shifts (more about that shortly).
  2. To adjust or transform my composition, where necessary. A line drawing can start to look quite different once I start to block in colour and tone, so it can be useful to check out whether the composition works now. Adjustments are much easier at this stage than after the detailed work starts and I’ve invested too much time and energy in the painting to want to start over.
  3. To add a depth of colour to the painting with glazes. Most of my underpainting will not be visible later on, but I build my portraits with a series of thin layers of paint (glazes). Each layer is allowed to dry before the next is applied and though the base coat is increasingly obscured with each layer that is added, the colour develops a translucence and depth that is otherwise difficult to achieve. This can be really helpful to create tonal depth and, by laying down some bright contrast colours in the underpainting, we can really make our later colours “flash” more brightly (I’ll give you an example of where I’ve done that that later on).

So, having set the scene, if you started your own portrait last week here’s the next stage (I used Atelier Interactive paints for the underpainting as a paint medium with a longer working period than most acrylics)…

Step 3. Ready to paint the Queen…..

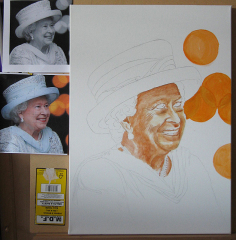
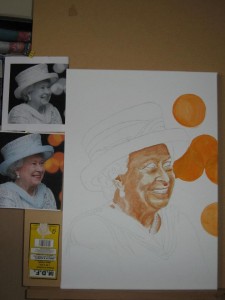
 After laying out the composition I lay down several layers of Burnt sienna, using an old sock to lift and soften the edges of each layer. This is  applied to the darker tonal areas of the face (check out the Black and White Photo). Darker areas receive more paint layers than the mid-tones, each blended into the last – this warm brown will help the shadows and reflect a warm quality in the skin tones later. I blend burnt Sienna toward Burnt umber in the background too to get a feel for the balance of the picture.

Looking at the coloured photo, there are much “cooler”, almost blue areas of the skin. I picked these out with Green Light which will cool down the skin tones later. I also used this beside the lips which will make them “flash” in the picture later as an extreme contrast to the red, adding a three-dimensional feel to the painting.

Referring back to the tonal black and white photo, I apply Dioxazine Purple to the very darkest areas of shadow. This has the unfortunate effect of introducing a slightly death-like appearance to the portrait, but will pay dividends later on!

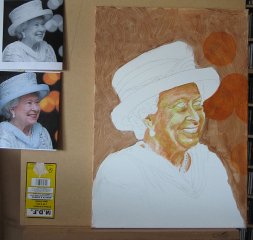
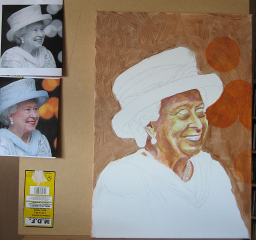
Time to check back on both original photos I add in further layers of each of the colours to create the depth and heat I want to “see” beneath my flesh tones later. It’s important to try and retain some white space in the mix too, where the highlights appear on the face!

 Last but not least, I apply further layers to the clothes and to the background of the picture (we have 5 layers here so far, with more to come later). I decided early on that I didn’t want to retain the odd orange lights as they are shown in the reference photo, but underpainting them in the picture means they reflect when the painting catches the light in a certain way, which adds an element of interest.

So, lots of effort at this stage, but that’s the underpainting done. I have created up to 8 layers of paint in places and though it sounds a little bizarre, have now finished with the Queen’s undies!

Next time…flesh tones, fabric and figuring out how to deal with the brooch or as Rihanna might say, make it “shine bright like a diamond”.

HELP! I missed Part 1 | Can’t wait for Part 3

How to…Paint the Queen – Initial sketch

How to paint the Queen?! I don’t even know how it happened, but as I just stumbled across a series of progress photos…..

Well, we had just spent a wet weekend in June, waving wet Union Jacks from a wet bridge at lots of wet people as they passed by in, on and around boats of varying degrees of wetness. Then, one minute I’m drawing David Beckham (just for fun, you understand, not personal pleasure) the next I’ve been talked into painting a portrait of HRH Queen Elizabeth II. Caught up in the sentiment of the whole Diamond Jubilee thing I was challenged by my niece to enter (with her) the Daily Mail’s portrait competition. The rest, as they say, was history…though I don’t think my niece quite got round to paint the queen – I guess her portrait is still history in the making!

Queen or just plain commoner (it’s all the same in the end), painting a portrait is quite a difficult thing in my opinion. Whether it’s of a person or an animal, in the end it has to look “right”, especially if someone has commissioned the piece. That’s not to say it has to look exactly like a person or animal in all respects, like a photo would, but this is one area in painting where the end result has to capture the essence of the subject. OK, so it is only my opinion, but if you set out to paint a well known figure like the Queen, most people will know if you’ve got it drastically wrong – I guess Picasso might disagree, or perhaps he just knew some really weird looking people.

So I have already assumed it’s unlikely she will sit for me and picked a favourite from the endless stream of pictures from recent events – it has to be one where she’s smiling for me! I have both a colour and a black and white copy (B&W makes it easier to understand the tonal values of the picture i.e. lights and darks, without letting colour confuse my eyes).

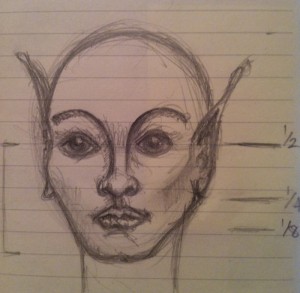
I’m also armed with my mental picture of the general anatomy of the human face and head. You might notice this is my slightly stylised version (I’m not suggesting HRH is a fairy or from the planet Vulcan – I just can’t help but doodle). This age old proportional information is what I was taught at school and I’ve applied it many times since:

image showing the proportions of the human face

1. Head = upside down egg

2. 1/2 way down = eye line

3. 1/2 way again = nose line

4. 1/2 way again = mouth

5. Eyes = 1/5 of width of face & 1 eye width apart

6. Nose = 1 eye width wide


It’s important to bear in mind that this “rule of thumb” information can only provide a starting point for any portrait helping to get things in roughly the right place. After that our observational skills have to pick up the characteristics that reflect the unique differences that make a particular individual i.e.gender, race, age etc.

So, back to my challenge to paint the Queen…..

Step 1 – Outline measurements

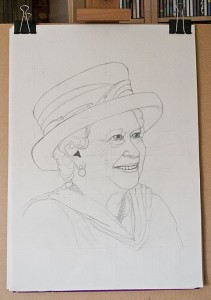
Outline pencil sketch of the Queen

I’m normally quite loose in the way I work, but for this exercise I meticulously measure and plot out the various angles in the image (you can make these out in the preliminary sketch) and the comparative dimensions of the face e.g. how many eyes wide is the face, lips etc.

I plot these out on a sheet of cartridge paper, along with an outline of the key features I want to incorporate in the finished picture. I also multiply measurements to increase the scale of the picture to something just about life size on the canvas. In no time at all I have my outline sketch.

Step 2 – Transfer to Canvas

I prefer to make any significant changes to the composition at this stage rather than after I’ve transferred the image to canvas, mainly because it’s much easier to adjust minor errors on paper! The hard work already done to adjust the image and increase the scale I can now simply trace the key elements of my sketch to and transfer the important reference points to my canvas. After marking the key elements I work to join the dots, just like in the puzzles I did as a kid – the key to success is identifying the right points and transferring them across. This time I used       a fine pencil to mark out my subject, ready to accept the first layer of under-painting:

Outline sketch of the Queen on canvas

3. Ready to paint the Queen…..

Next time I’ll outline my approach to under painting, the techniques and colours used to provide the foundation layers for the painting. In the meantime you could have a go at creating your own outline portrait. Any photograph would do for practice or you could try using a mirror and make it a self portrait!

HELP! Take me to Part 2 | Part 3