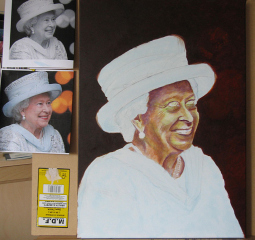
OK, so I don’t mean “undies” literally, it’s not like I’m suggesting we’re going to paint the Queen and put a pair of bloomers on Her Majesty’s head or anything (though that might have caught the attention of the competition judges). Hey, if that’s why you’re here…I’m sorry, but my upbringing would prevent me from doing anything quite so irreverent.
Yes, I can still remember those times when, as a kid armed with my Union Jack Flag on a stick I queued on Wimbledon High Street with my Mum and siblings waiting to wave it wildly for the Queen when she visited. I also remember:
- Celebrating the Silver Jubilee with a red, white and blue street party in 1977 (I still polish the celebration spoon every few years)
- Waiting with nose pressed against the Buckingham Palace railings waiting for a glimpse of Charles and Diana, following their engagement, and shouting “we want more, we want more” to bring them back out onto the balcony once they had obliged us with a wave the first time
- Watching the Queen pass really close up when I formed the guard of honour on centre court, Wimbledon, as a ball girl
Yes, I remember all those things and more. I will admit to being into the punk scene as a teenager though, partly because I had a strange fascination for safety pins (or at least the reaction of people who thought you were wearing them through your ears and/or nose once you had taken enough off the sharp, pointy end to slide them into position). This wasn’t a phase that lasted long, but it meant I enjoyed the Sex Pistols’ rendition of God Save The Queen just as much as the next rebellious teenager! On balance though …no chance we’ll be doing the Queen’s underwear here!
Anyway, last time round I explained how I develop an initial outline sketch for a portrait. This one happens to be about my portrait of the Queen, but the same approach can be applied to anyone. With the outline transferred to canvas we’re ready to move on to our painting.
What are the undies?
The “undies” are what the picture will be wearing underneath the surface, once finished. Like all good undies (current fashions excepted – don’t think I’ll ever get the need to show one’s pants) the underpainting for our portrait will likely be unseen once it’s fully dressed. That might beg the question “why bother then?” but I like to create a good underpainting for a few reasons:
- To reduce the “tooth” on the canvas. All my canvasses are pre-primed with two coats of Gesso but this still leaves quite a “tooth” or texture on the canvas. Once I’ve added a couple more layers of paint to the surface the paint flows much more easily for subsequent glaze layers and that helps when I want to manipulate the paint to blend soft edges and tonal shifts (more about that shortly).
- To adjust or transform my composition, where necessary. A line drawing can start to look quite different once I start to block in colour and tone, so it can be useful to check out whether the composition works now. Adjustments are much easier at this stage than after the detailed work starts and I’ve invested too much time and energy in the painting to want to start over.
- To add a depth of colour to the painting with glazes. Most of my underpainting will not be visible later on, but I build my portraits with a series of thin layers of paint (glazes). Each layer is allowed to dry before the next is applied and though the base coat is increasingly obscured with each layer that is added, the colour develops a translucence and depth that is otherwise difficult to achieve. This can be really helpful to create tonal depth and, by laying down some bright contrast colours in the underpainting, we can really make our later colours “flash” more brightly (I’ll give you an example of where I’ve done that that later on).
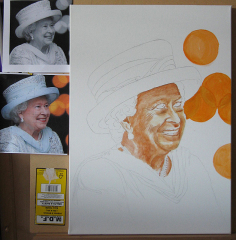
So, having set the scene, if you started your own portrait last week here’s the next stage (I used Atelier Interactive paints for the underpainting as a paint medium with a longer working period than most acrylics)…
Step 3. Ready to paint the Queen…..
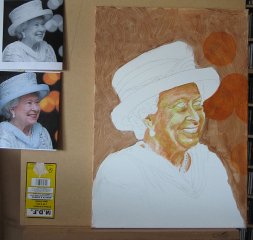
After laying out the composition I lay down several layers of Burnt sienna, using an old sock to lift and soften the edges of each layer. This is applied to the darker tonal areas of the face (check out the Black and White Photo). Darker areas receive more paint layers than the mid-tones, each blended into the last – this warm brown will help the shadows and reflect a warm quality in the skin tones later. I blend burnt Sienna toward Burnt umber in the background too to get a feel for the balance of the picture.
Looking at the coloured photo, there are much “cooler”, almost blue areas of the skin. I picked these out with Green Light which will cool down the skin tones later. I also used this beside the lips which will make them “flash” in the picture later as an extreme contrast to the red, adding a three-dimensional feel to the painting.
Referring back to the tonal black and white photo, I apply Dioxazine Purple to the very darkest areas of shadow. This has the unfortunate effect of introducing a slightly death-like appearance to the portrait, but will pay dividends later on!
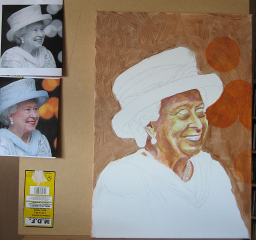
Time to check back on both original photos I add in further layers of each of the colours to create the depth and heat I want to “see” beneath my flesh tones later. It’s important to try and retain some white space in the mix too, where the highlights appear on the face!
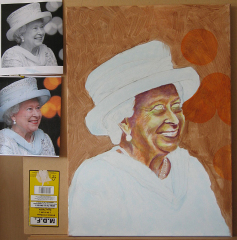
Last but not least, I apply further layers to the clothes and to the background of the picture (we have 5 layers here so far, with more to come later). I decided early on that I didn’t want to retain the odd orange lights as they are shown in the reference photo, but underpainting them in the picture means they reflect when the painting catches the light in a certain way, which adds an element of interest.
So, lots of effort at this stage, but that’s the underpainting done. I have created up to 8 layers of paint in places and though it sounds a little bizarre, have now finished with the Queen’s undies!
Next time…flesh tones, fabric and figuring out how to deal with the brooch or as Rihanna might say, make it “shine bright like a diamond”.

