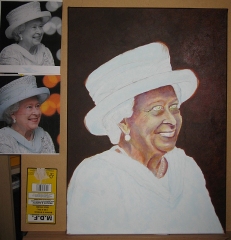
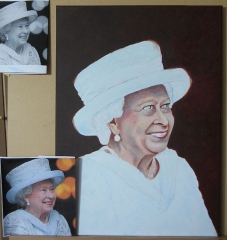
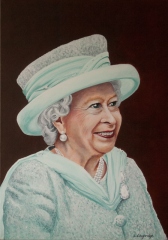
…and so to the grand(?) finale of our paint the Queen series. In previous posts we measured her up to create an initial sketch then painted the foundation layers of the painting (her undies). Unfortunately, this created a slightly bizarre green/purple face at the half way point that resembled a face made of corned beef, so it’s important to keep the faith at this stage.
With the underpainting complete, we’re ready to start applying the flesh tone glazes that will (hopefully) develop into the universally recognisable facial features of the Queen (or whoever else we may be painting at this stage – the same process applies regardless of our subject). So, with our tools at the ready…we’re ready for our final flourish.
Step 4. Fleshing out the detail
I prefer to use my own recipe to create the flesh tones in my paintings, rather than using flesh tones or buff whites from a tube. This is mainly so I know what colours I’m working with and can manipulate them as I want to. It’s a bit more tricky to adjust red and yellow values in the flesh tones when you don’t know quite what went into the pre-mixed tubes (the argument does fall down a bit with the addition of yellow ochre, but that’s much less significant in the proportions of the mix).
Karen’s flesh tone recipe:
- White – I tend to use titanium white, but flake white works well too
- Yellow Ochre
- Cadmium red (Light)
- Cadmium Yellow
- Burnt Sienna
- Burnt Umber
- Ultramarine Blue
Generally I use about 6/7 parts white to 1 part colour and tend to use cadmium yellow or yellow ochre and cadmium red to create a base flesh tone. Beware of adding too much red and creating the kind of pink flesh we might have created when we were kids – skin has much more yellow in it than you might think! To create medium flesh tones I use yellow ochre instead of cadmium yellow, and a touch of burnt sienna. Finally for darker flesh tones I’ll use cadmium red, burnt sienna, and burnt umber – ultramarine blue helps to create cool tones too!
I always work with a stay wet palette to help keep the acrylic paints workable for longer, so I mix a range of skin tones I’m likely to need before I start working on the facial features. This means I can pick up from the full range and blend my colours quickly before the acrylic dries on the canvas.The Queen receives her first glaze layer using a light flesh tone which starts to bring the under-painted elements together immediately.
A few more glaze layers and as the corned beef effect disappears the face is becoming more real, and developing a lovely depth. Working with the pre-mixed palette means I can pick up a touch of the dioxazine purple and greens I used in previous layers as I work, to cool and/or darken the tonal values. Picking out the detail of the lips and shadows of the eyes helps too, but you can really start to see the benefits of having those base layers now as the “undies” reflect through the translucent final glazes!
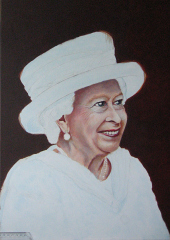
A final flesh glaze, with a touch of red to the cheeks and we’re ready to work the facial features to a finish. The eyes are a grey-blue, picked out of the palette with ultramarine blue and Payne’s Grey. They come to life with the addition of a highlight to make them sparkle.
The lips are finished with cadmium red, tempered with dioxazine purple and some burnt umber lowlights. Notice also how the reds stand out and “flash” against the purple we under-painted earlier, below the lower lip. One of the things to watch out for now is the teeth…picked out individually, these can easily look like tombstones and create the impression they have been borrowed from one of the mares in the Queen’s stables! (I’ll tone these down shortly with Payne’s Grey and a little yellow ochre to try to make them recede a little.
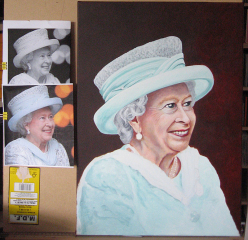
The Queen’s hair has little more colour than my own and I know mine is made up of a balance of dark hair among lighter hair…cue Payne’s Grey with Titanium white. The same palette produces a stippled texture in the hat, with the addition of a pearlescent medium to help this shimmer, and is reused to create the shadows in the rest of the outfit, before the application of colour, which is built up in further layers.
The final challenge…the Queen’s jewellery. The pearls are relatively easy to create using white, a touch of yellow and Payne’s Grey in varying proportions to create highlight, lowlight and shadows (used to touch in the the teeth too). The greater challenge however is to create the impression of brilliance emerging from the Cullinan Diamond brooch. Reference to various images on the internet and elsewhere makes it clear there’s no way I can paint the myriad facets carved into these beautiful stones. The images are good enough though to provide an idea of overall shape and the main facets of the stones and I can create the impression of these using my trusty Payne’s Grey, yellow hints and blue and brilliant white highlights to create the sparkle.
This was without doubt one of the most difficult pictures I have painted and as usual I know where and how I would improve a further attempt. I didn’t succeed in the competition I painted the picture for, but I have a strong sense of personal satisfaction. I have completed the task, produced a painting that resembles and even improves upon the Queen (I have brightened her eyes and teeth slightly to take a couple of years off her) and I know the painting is recognisable as HRH.
Above all, I have thoroughly enjoyed putting my all too infrequently used portrait painting skills into practice…I must do something like this again and very soon! In the meantime…..where on earth do I hang a Portrait of the Queen?!
HELP! I missed Part 1 | Part 2

